Hot on the heels of my last review for DevExpress Universal 2014.2, I will next dive into my recent experiences with DevExpress TestCafe.
Introduction
TestCafe is the functional web testing tool from DevExpress. While many web test products work in conjunction with browser plugins, TestCafe works without plugins on any browser that supports HTML5. In today’s world, that translates to ‘any modern browser’.
You can also run on the big three operating systems, Windows, Mac OSX and Linux. I have been working with TestCafe on Windows 8.1, Windows 10 and OSX Yosemite. This operating system and browser agnostic ability affords maximum flexibility for web developers to test applications across multiple versions of browsers. All that is required is another physical or virtual machine running the desired browser(s).
That all sounds great, but you probably hear a lot about cross-browser, cross-platform ability these days. Take a minute and think about what that really means for a functional web testing tool. I can open TestCafe from any browser that can access the machine(s) where TestCafe and my application under test have been installed. So, I can pull out my Ultrabook on the road and record new tests over my company’s VPN. I could also break out my iPod Touch, tablet or Windows Phone and execute test fixtures. That is pretty powerful.
Getting Started
TestCafe claims to be “Functional Web Test, Made Easy”. Let’s see how easy it is to get started using the product. Until last month, I have never used TestCafe. In fact, I never used any kind of web test automation product. I’ve been lucky enough to work for organizations that understand the value to QA and hire dedicated testers who find my bugs that get past my own unit testing and manual testing.
So, how does a newbie like me get started?
DevExpress Demo Pages
A great first place to start is by trying TestCafe through the online demo pages. There are three pages available for selection.
- TestCafe Example Page
- ASPxGridView Demo Page
- ASPxFileManager Demo Page
I decide to try the ASPxGridView Demo Page, so I select it from the list and click the ‘Run Demo’ button. Here is what I see initially.
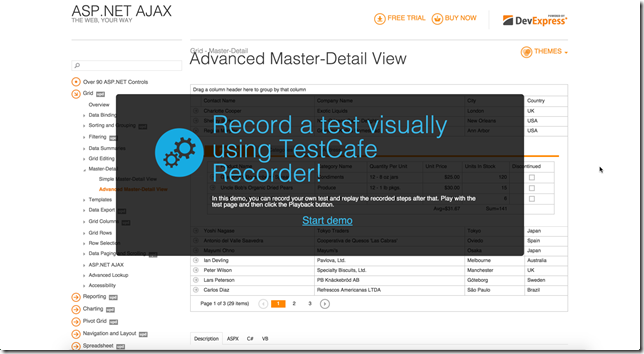
Figure 1 – Run the online demo
I click the Start Demo link and click through some controls on the grid to auto generate a few test steps.
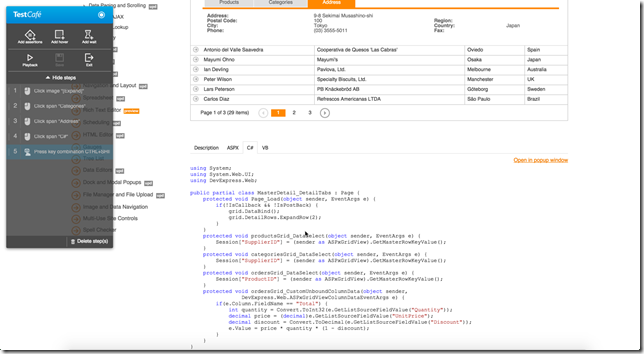
Figure 2 – Online demo test steps
TestCafe includes all of my clicks and keystrokes into the test steps (even my screen capture keystrokes in Step 5 J). Now I can add some assertions to my test fixture or playback the steps that have been generated so far.
After completing this quick demo, I feel ready to jump into the Online Tutorial and create some of my own tests on my development machine.
Online Tutorial
From the main page for TestCafe, there’s a big button that will take you to an online tutorial with videos and step-by-step instructions for getting started with your first tests.

Figure 3 – The big button.
The online tutorial steps you through creating a project, recording tests, running them, and finally running on remote devices. Here’s a look at the complete outline of the tutorial’s steps.
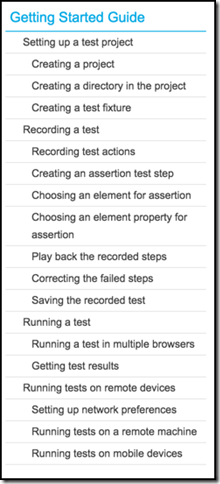
Figure 4 – Tutorial Steps
Completing the online tutorial will give you an idea of the base functionality and capabilities of TestCafe. Now it’s time to take that knowledge to the next step.
AngularJS PhoneCat Tutorial App
Now that I have taken some time to familiarize myself with TestCafe using web pages created by DevExpress, I want to try creating a few simple test fixtures with a page that uses one of today’s most popular JavaScript frameworks, AngularJS. I have been working mainly in the world of Windows desktop applications and WPF for the last 18 months, so I turn to Bing to find out how to set up and run a simple AngularJS site.
Not surprisingly, Bing takes me to the AngularJS site where I see that there is a Tutorial under the Develop menu. The tutorial walks you through downloading their sample site, setting it up with Node.js and npm, and running it. The sample site is a simple catalog of Android devices with a list view and detail view.
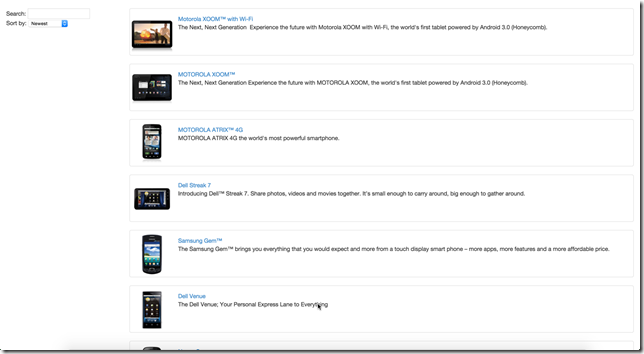
Figure 5 – AnguluarJS tutorial application – list view
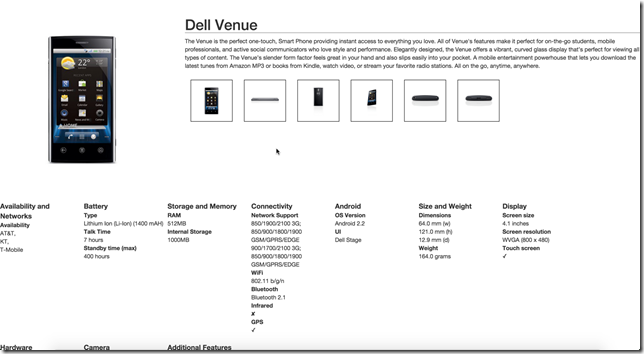
Figure 6 – AngularJS tutorial application – detail view
I create a new Test Project and Test Fixture and record a few tests for the List View page.
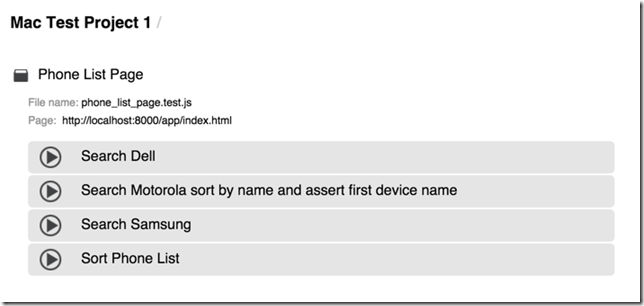
Figure 7 – Phone List tests
Up to this point everything has been produced for us by TestCafe. Let’s take a moment analyze what has been generated for the tests I created for the Phone List Page. Here’s the JavaScript that is presented when clicking the Edit button on one of the tests or on the Test Fixture itself.
"@fixture Phone List Page";
"@page http://localhost:8000/app/index.html";

"@test"["Sort Phone List"] = {
    "1.Click select": function() {
        var actionTarget = function() {
            return $(".ng-pristine.ng-untouched.ng-valid").eq(1);
        };
        act.click(actionTarget);
    },
    '2.Click option "Alphabetical"': function() {
        act.click(":containsExcludeChildren(Alphabetical)");
    },
    "3.Click select": function() {
        act.click(".ng-untouched.ng-valid.ng-dirty.ng-valid-parse");
    },
    '4.Click option "Newest"': function() {
        act.click(":containsExcludeChildren(Newest)");
    }
};

"@test"["Search Dell"] = {
    "1.Click input": function() {
        var actionTarget = function() {
            return $(".ng-pristine.ng-untouched.ng-valid").eq(0);
        };
        act.click(actionTarget);
    },
    "2.Type in input": function() {
        var actionTarget = function() {
            return $(".ng-pristine.ng-untouched.ng-valid").eq(0);
        };
        act.type(actionTarget, "Dell");
    }
};

"@test"["Search Samsung"] = {
    "1.Click input": function() {
        var actionTarget = function() {
            return $(".ng-pristine.ng-untouched.ng-valid").eq(0);
        };
        act.click(actionTarget);
    },
    "2.Type in input": function() {
        var actionTarget = function() {
            return $(".ng-pristine.ng-untouched.ng-valid").eq(0);
        };
        act.type(actionTarget, "Samsung");
    }
};

"@test"["Search Motorola sort by name and assert first device name"] = {
    "1.Type in input": function() {
        var actionTarget = function() {
            return $(".ng-pristine.ng-untouched.ng-valid").eq(0);
        };
        act.type(actionTarget, "Motorola");
    },
    "2.Click select": function() {
        act.click(".ng-pristine.ng-untouched.ng-valid");
    },
    '3.Click option "Alphabetical"': function() {
        act.click(":containsExcludeChildren(Alphabetical)");
    },
    "4.Assert": function() {
        eq($(":containsExcludeChildren(DROID 2 Global by Motorola)").text(), "DROID™ 2 Global by Motorola", "First Moto Device");
    }
};
Notice that the test fixture is designated with @fixture, and each test definition with @test… pretty straightforward. Each test step is a function that returns the UI element to act upon followed by the action to perform on that element. My final test includes an assert as a final step. This checks that the first list element’s text is equal to what is expected after searching for Motorola and sorting the results alphabetically.
I can access the test fixture on my Windows Phone’s browser.
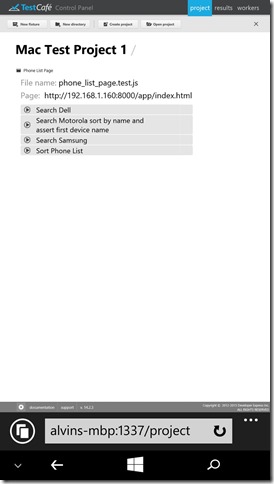
Figure 8 – TestCafe on Windows Phone 8.1
And I can kick off a test run.
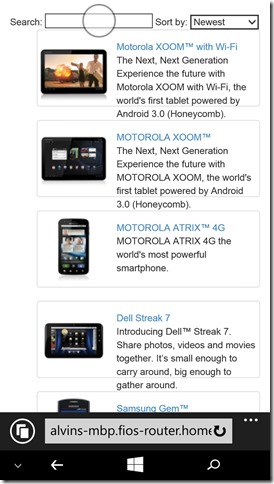
Figure 9 – Tests executing on Windows Phone 8.1
So, that is a quick look at some of the basics of getting TestCafe up and running. There is a lot you can accomplish without knowing much more than what the Online Tutorial provides. To learn some more advanced features of the test fixtures in TestCafe, refer to the Test Fixture API Reference guide in the online documentation.
Feature Focus – Continuous Integration
I am a big fan of automated builds and continuous integration (CI) in development. I think it is one of the essentials of creating quality software. CI can do things for your team like running unit tests, code analysis and enabling continuous deployments to dev and test environments. Even at a bare minimum, CI can provide immediate feedback if a change one developer makes in a software component breaks something else in the system.
Automating and integrating functional web tests with CI builds is an extremely valuable proposition. It means that the number of regression bugs discovered by QA will be greatly reduced as builds that fail test steps in TestCafe will never be deployed to QA environments.
TestCafe has an entire section of their online documentation dedicated to continuous integration as well as a CI API reference.
At a glance, these are the steps that will need to be completed to set up CI for most types of servers (taken from the online docs).
- Copy your tests to the server.
- Setup TestCafe on the server.
- Write a Node.js application that runs the tests and logs the results.
- Call the application from your Continuous Integration system.
The sample node.js app in the online docs logs results to the console. Depending on your CI system, you will either use this method and pick up the results through the console output, or you may want to log the output to a file. There is an example of file output on another online documentation example. Here’s a snippet of that example:
var fs = require('fs');

testCafe.runTests(runOptions, function () {
      testCafe.on('taskComplete', function (report) {
           log('\n' + new Date().toString() + ':\n' + JSON.stringify(report));
       });
});

function log(mssg) {
       fs.appendFile(LOG_FILE_NAME, mssg, function (err) {
             if (err)
                throw err;
       });
}
My current build server of choice at home and at work is JetBrains TeamCity. I have also used CruiseControl .NET in the past. While the basic steps were a good starting point, I wanted to find more detailed instructions specific to my TeamCity implementation.
Getting Support
I want to find out more information about TestCafe continuous integration with TeamCity. Where do I turn? To me, the logical first step is to try the Support page on the TestCafe site.
I kept it simple and searched for “TeamCity” and got just a single search result. Luckily, this one result was exactly what I needed. There is no direct support between TestCafe and TeamCity, but they can be integrated using the node.js app approach detailed in the online CI documentation. The method for doing this is similar for Jenkins CI servers, and Marion the DevExpress support representative who answered the question provided a link to the Jenkins information.
The TeamCity equivalent of these Jenkins steps include:
· Create a node.js app and place it on the build server. (The app in the Jenkins example will serve.)
· Install node.js on the build server.
· Add a Windows Command Line step to the desired build configuration in TeamCity that executes the node.js app.
· Capture the result.xml as the build report output.
If you want immediate feedback on your continuous builds, you will probably want to limit the number of tests run. I recommend creating either an hourly or daily build that executes all of your unit tests, integration tests and TestCafe functional tests.
Wrapping Up
Automating your functional tests can provide a great deal of value to any product. It takes a huge load off of the QA department once a full test suite has been created for your web applications. The licensing cost of TestCafe makes it something that every development shop should consider, regardless of the company or team size.
Go give it a try. There’s a 30-day free trial plus a 60-day money back guarantee if you’re not satisfied with the product.
Happy coding!
Disclosure of Material Connection: I received one or more of the products or services mentioned above for free in the hope that I would mention it on my blog. Regardless, I only recommend products or services I use personally and believe my readers will enjoy. I am disclosing this in accordance with the Federal Trade Commission’s 16 CFR, Part 255: “Guides Concerning the Use of Endorsements and Testimonials in Advertising.”


