Intro
Over the last several weeks, I have been building some simple OCR applications in my spare time using a trial version of the FineReader Engine by ABBYY. FineReader Engine is an SDK for building powerful applications that can open images, PDF documents and scanned documents, analyze and parse the contents and output the results. Almost any type of export file containing text results can be produced, including text-based PDF, Microsoft Office formats, XML (particularly useful for integrating OCR results with other systems) and more.
About FineReader Engine
I think the best summary of the FineReader Engine’s capabilities can be found on ABBYY’s site.
ABBYY FineReader Engine is a powerful OCR SDK to integrate ABBYY’s state-of-the-art document recognition and conversion software technologies such as: optical character recognition (OCR), intelligent character recognition (ICR), optical mark recognition (OMR), barcode recognition (OBR), document imaging, and PDF conversion.
Developers should consider ABBYY FineReader if you are building an application which will require any of the following capabilities:
- Document Conversion
- Document Archiving
- Book Archiving
- Text Extraction
- Field Recognition
- Barcode Recognition
- Image Preprocessing
- Scanning
More than a dozen sample apps are included with the SDK, including examples in C++, C#, VB.NET, VB, Delphi, Java and several scripting languages (JavaScript, Perl and VBScript).
Installation and Setup
There are a couple of steps to setting up FineReader Engine on a development machine. First, a license server must be installed. It can either be installed directly on the development machine if only a single developer will be using the SDK. If several developers will be using FineReader Engine from multiple workstations, the license server should be installed on an application server that is available to all the developer machines. The license server must be installed on a physical machine, not a VM. (Note that the technology can run in VM and cloud environments.) The license manager is where you will add and activate each of your licenses, trial or purchased.
Next the FineReader Engine itself can be installed on the development machine and pointed to the license server.
After installation is complete if you are using Visual Studio 2010 or 2012, there are a couple of additional steps that must be followed to enable the use of the Visual Components (controls). These steps are listed on the “Using Visual Components in Different Versions of Visual Studio” page in the included SDK help file.
To install Interop assemblies manually, do the following:
- The Interop assemblies for .NET Framework 4.0 are located in the ProgramDataABBYYInc.Net interopsv4.0 folder. Register Interop.FREngine.dll and Interop.FineReaderVisualComponents.dll from a Visual Studio Command Prompt:
- regasm.exe [path-to-the-interop-assemblies]Interop.FREngine.dll /registered /codebase
- regasm.exe [path-to-the-interop-assemblies]Interop.FineReaderVisualComponents.dll /registered /codebase
- Install the Interop assemblies to GAC:
- gacutil.exe /if [path-to-the-interop-assemblies]Interop.FREngine.dll
- gacutil.exe /if [path-to-the-interop-assemblies]Interop.FineReaderVisualComponents.dll
You are now ready to start developing with the SDK.
Creating a Project
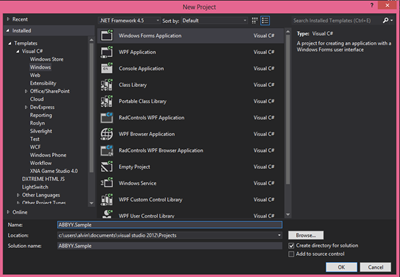
To get started create a new Windows Forms Application in either C# or Visual Basic. I used Visual Studio 2012 for my application development.
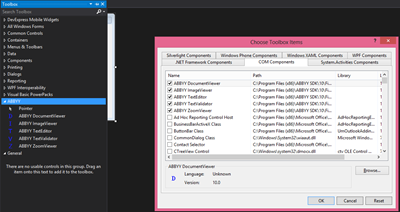
Next add the ABBYY controls to the Visual Studio Toolbox window. I created a new ABBYY section in the Toolbox.
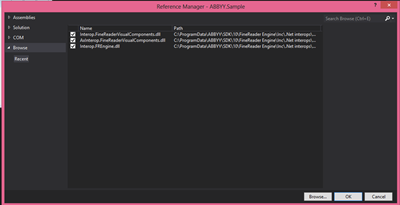
Add references to your project to the three Interop DLLs in the ABBYY Inc.Net Interops folder which were registered and added to the GAC during the setup process.
UI Controls
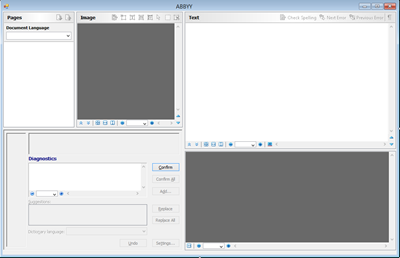
This is a look at all five of the ABBYY controls on a Windows Form in design view.
Going clockwise from the top left, the controls are:
DocumentViewer – This control shows the list of pages loaded from an image/document and the processing status of each page. The pages can be shown in a thumbnail or details view.
ImageViewer – This control allows the application’s user to view and edit the page selected in the DocumentViewer.
TextEditor – The TextEditor allows users to view and edit the text that was recognized by the FREngine on the selected page.
ZoomViewer – This control allows users to zoom in and out of a area selected in the ImageViewer.
TextValidator – This control provides and interface for users to make adjustments to areas of text not recognized during the scanning and validation process. This is also the user interface for spell checking a document.
Synchronizing documents and pages across these controls is as easy as adding each one to a ComponentSynchronizer object in the code like so:
// Attach components to Synchronizer
Synchronizer = new FineReaderVisualComponents.ComponentSynchronizerClass();
Synchronizer.DocumentViewer = ( FineReaderVisualComponents.DocumentViewer ) documentViewer.GetOcx();
Synchronizer.ImageViewer = ( FineReaderVisualComponents.ImageViewer ) imageViewer.GetOcx();
Synchronizer.ZoomViewer = ( FineReaderVisualComponents.ZoomViewer ) zoomViewer.GetOcx();
Synchronizer.TextEditor = ( FineReaderVisualComponents.TextEditor ) textEditor.GetOcx();
The Engine
Here’s a simple example of how to launch a form with all five FineReader controls and load a PDF file.
IEngine engine;
FRDocument document;
ComponentSynchronizer synchronizer;
IEngineLoader loader;

private void LoadEngine()
{
    loader = new FREngine.InprocLoader();
    engine = loader.GetEngineObject("xxxx-xxxx-xxxx-xxxx-xxxx-xxxx");

    engine.ParentWindow = this.Handle.ToInt32();
    engine.ApplicationTitle = this.Text;
    document = engine.CreateFRDocumentFromImage(@"C:UsersAlvinMiscDocuments10-22-08_2012letter.pdf");
    synchronizer.Document = document;
}

private void SyncComponents()
{
    synchronizer = new ComponentSynchronizer();
    synchronizer.DocumentViewer = (FineReaderVisualComponents.DocumentViewer)DocViewer.GetOcx();
    synchronizer.ImageViewer = (FineReaderVisualComponents.ImageViewer)ImgViewer.GetOcx();
    synchronizer.TextEditor = (FineReaderVisualComponents.TextEditor)textEdit.GetOcx();
    synchronizer.ZoomViewer = (FineReaderVisualComponents.ZoomViewer)zoomView.GetOcx();
    synchronizer.TextValidator = (FineReaderVisualComponents.TextValidator)textVal.GetOcx();
}

private void UnloadEngine()
{
    // If Engine was loaded, unload it
    if (engine != null)
    {
        engine = null;
    }
}

private void DocumentForm_Load(object sender, EventArgs e)
{
    SyncComponents();
    LoadEngine();
}

private void DocumentForm_FormClosing(object sender, FormClosingEventArgs e)
{
    UnloadEngine();
}
Of course in a real-world application, you will probably implement a button the user can invoke to choose a file from the file system to open. It is important to note that unloading the engine is very important. Failing to do so will tie up the license for your workstation until it is manually released from the license server. We are dealing with COM interop… resource and memory management is very important.
Recognition
Running recognition processing on a loaded document is a relatively simple matter as well. Here is a method that manages the process.
private void RecognizeDocument()
{
    FREngine.ProcessingParams processingParams = synchronizer.ProcessingParams;

    FREngine.DIFRDocumentEvents_OnProgressEventHandler progressHandler =
        new FREngine.DIFRDocumentEvents_OnProgressEventHandler(document_OnProgress);

    document.OnProgress += progressHandler;

    document.Process(processingParams.PageProcessingParams,
        processingParams.SynthesisParamsForPage, processingParams.SynthesisParamsForDocument);

    document.OnProgress -= progressHandler;
}
The progressHanlder provides the opportunity to keep the UI responsive and allows users to invoke a Cancel command to stop a long-running document recognition process.
Exporting
To export a loaded document, the Export() method on your document object is invoked. Here is an example snippet that exports the loaded document to an RTF file:
synthesizeIfNeed();
Document.Export(fileName, FREngine.FileExportFormatEnum.FEF_RTF, null);
Profiles
ABBYY FineReader Engine also supports ‘Profiles’ which enable the engine to optimize its processing based on the current usage scenario. Here are the Profiles currently available.
- DocumentConversion_Accuracy — for converting documents into editable formats, optimized for accuracy
- DocumentConversion_Speed — for converting documents into editable formats, optimized for speed
- DocumentArchiving_Accuracy — for creating an electronic archive, optimized for accuracy
- DocumentArchiving_Speed — for creating an electronic archive, optimized for speed
- BookArchiving_Accuracy — for creating an electronic library, optimized for accuracy
- BookArchiving_Speed — for creating an electronic library, optimized for speed
- TextExtraction_Accuracy — for extracting text from documents, optimized for accuracy
- TextExtraction_Speed — for extracting text from documents, optimized for speed
- FieldLevelRecognition — for recognizing short text fragments
- BarcodeRecognition — for extracting barcodes
- Version9Compatibility — provided for compatibility, sets the processing parameters to the default values of ABBYY FineReader Engine 9.0.
The Engine.LoadPredefinedProfile(profileName) method is used to load one of these profiles. Creating a custom user-defined profile is also supported via an INI-style format. There are detailed instructions in the included help file for assistance in creating these custom profiles. Custom user profiles are loaded with a call to Engine.LoadProfile(fileName).
Other Platforms and Products
I only used the Windows SDK for FineReader, but there are several other products available from ABBYY. There are Mac OS, Linux, Embedded and Mobile SDKs available as well. Also available is Web API for developers via ABBYY’s hosted Cloud environment on Azure (go to www.ocrsdk.com). ABBYY also has some powerful out-of-the-box OCR products to choose from. Visit their site to check out all of their offerings.
The Bottom Line
Setting up and using the ABBYY FineReader Engine SDK is really simple and it provides access to powerful OCR capabilities for your applications. I highly recommend reviewing their products if you have OCR requirements for your own application. Why re-invent the wheel?
Disclosure of Material Connection: I received one or more of the products or services mentioned above for free in the hope that I would mention it on my blog. Regardless, I only recommend products or services I use personally and believe my readers will enjoy. I am disclosing this in accordance with the Federal Trade Commission’s 16 CFR, Part 255: “Guides Concerning the Use of Endorsements and Testimonials in Advertising.”


