The Dew Review – ABBYY FineReader Engine OCR SDK

Intro

Over the last several weeks, I have been building some simple OCR applications in my spare time using a trial version of the FineReader Engine by ABBYY. FineReader Engine is an SDK for building powerful applications that can open images, PDF documents and scanned documents, analyze and parse the contents and output the results. Almost any type of export file containing text results can be produced, including text-based PDF, Microsoft Office formats, XML (particularly useful for integrating OCR results with other systems) and more.

About FineReader Engine

I think the best summary of the FineReader Engine’s capabilities can be found on ABBYY’s site.

ABBYY FineReader Engine is a powerful OCR SDK to integrate ABBYY’s state-of-the-art document recognition and conversion software technologies such as: optical character recognition (OCR), intelligent character recognition (ICR), optical mark recognition (OMR), barcode recognition (OBR), document imaging, and PDF conversion.

Developers should consider ABBYY FineReader if you are building an application which will require any of the following capabilities:

  • Document Conversion
  • Document Archiving
  • Book Archiving
  • Text Extraction
  • Field Recognition
  • Barcode Recognition
  • Image Preprocessing
  • Scanning

More than a dozen sample apps are included with the SDK, including examples in C++, C#, VB.NET, VB, Delphi, Java and several scripting languages (JavaScript, Perl and VBScript).

Installation and Setup

There are a couple of steps to setting up FineReader Engine on a development machine. First, a license server must be installed. It can either be installed directly on the development machine if only a single developer will be using the SDK. If several developers will be using FineReader Engine from multiple workstations, the license server should be installed on an application server that is available to all the developer machines. The license server must be installed on a physical machine, not a VM. (Note that the technology can run in VM and cloud environments.) The license manager is where you will add and activate each of your licenses, trial or purchased.

Next the FineReader Engine itself can be installed on the development machine and pointed to the license server.

After installation is complete if you are using Visual Studio 2010 or 2012, there are a couple of additional steps that must be followed to enable the use of the Visual Components (controls). These steps are listed on the “Using Visual Components in Different Versions of Visual Studio” page in the included SDK help file.

To install Interop assemblies manually, do the following:

  1. The Interop assemblies for .NET Framework 4.0 are located in the ProgramDataABBYYInc.Net interopsv4.0 folder. Register Interop.FREngine.dll and Interop.FineReaderVisualComponents.dll from a Visual Studio Command Prompt:
    • regasm.exe [path-to-the-interop-assemblies]Interop.FREngine.dll /registered /codebase
    • regasm.exe [path-to-the-interop-assemblies]Interop.FineReaderVisualComponents.dll /registered /codebase
  2. Install the Interop assemblies to GAC:
    • gacutil.exe /if [path-to-the-interop-assemblies]Interop.FREngine.dll
    • gacutil.exe /if [path-to-the-interop-assemblies]Interop.FineReaderVisualComponents.dll

You are now ready to start developing with the SDK.

Creating a Project

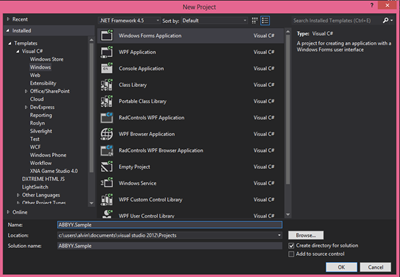
To get started create a new Windows Forms Application in either C# or Visual Basic. I used Visual Studio 2012 for my application development.

ABBYY.1.NewProject

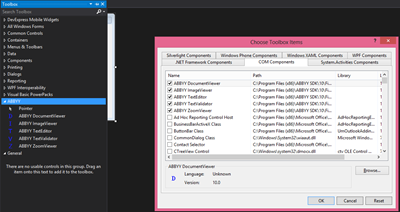
Next add the ABBYY controls to the Visual Studio Toolbox window. I created a new ABBYY section in the Toolbox.

ABBYY.2.AddControls

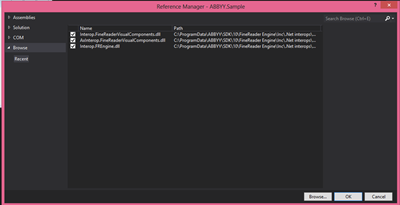
Add references to your project to the three Interop DLLs in the ABBYY Inc.Net Interops folder which were registered and added to the GAC during the setup process.

ABBYY.3.AddReferences

UI Controls

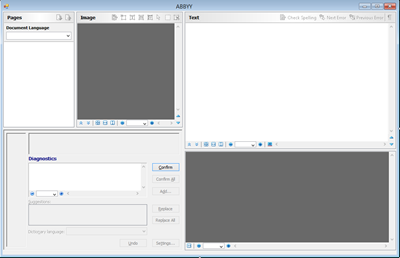
This is a look at all five of the ABBYY controls on a Windows Form in design view.

ABBYY.4.ControlsOnForm

Going clockwise from the top left, the controls are:

DocumentViewer – This control shows the list of pages loaded from an image/document and the processing status of each page. The pages can be shown in a thumbnail or details view.

ImageViewer – This control allows the application’s user to view and edit the page selected in the DocumentViewer.

TextEditor – The TextEditor allows users to view and edit the text that was recognized by the FREngine on the selected page.

ZoomViewer – This control allows users to zoom in and out of a area selected in the ImageViewer.

TextValidator – This control provides and interface for users to make adjustments to areas of text not recognized during the scanning and validation process. This is also the user interface for spell checking a document.

Synchronizing documents and pages across these controls is as easy as adding each one to a ComponentSynchronizer object in the code like so:

// Attach components to Synchronizer
Synchronizer = new FineReaderVisualComponents.ComponentSynchronizerClass();
Synchronizer.DocumentViewer = ( FineReaderVisualComponents.DocumentViewer ) documentViewer.GetOcx();
Synchronizer.ImageViewer = ( FineReaderVisualComponents.ImageViewer ) imageViewer.GetOcx();
Synchronizer.ZoomViewer = ( FineReaderVisualComponents.ZoomViewer ) zoomViewer.GetOcx();
Synchronizer.TextEditor = ( FineReaderVisualComponents.TextEditor ) textEditor.GetOcx();

The Engine

Here’s a simple example of how to launch a form with all five FineReader controls and load a PDF file.

IEngine engine;
FRDocument document;
ComponentSynchronizer synchronizer;
IEngineLoader loader;

private void LoadEngine()
{
    loader = new FREngine.InprocLoader();
    engine = loader.GetEngineObject("xxxx-xxxx-xxxx-xxxx-xxxx-xxxx");

    engine.ParentWindow = this.Handle.ToInt32();
    engine.ApplicationTitle = this.Text;
    document = engine.CreateFRDocumentFromImage(@"C:UsersAlvinMiscDocuments10-22-08_2012letter.pdf");
    synchronizer.Document = document;
}

private void SyncComponents()
{
    synchronizer = new ComponentSynchronizer();
    synchronizer.DocumentViewer = (FineReaderVisualComponents.DocumentViewer)DocViewer.GetOcx();
    synchronizer.ImageViewer = (FineReaderVisualComponents.ImageViewer)ImgViewer.GetOcx();
    synchronizer.TextEditor = (FineReaderVisualComponents.TextEditor)textEdit.GetOcx();
    synchronizer.ZoomViewer = (FineReaderVisualComponents.ZoomViewer)zoomView.GetOcx();
    synchronizer.TextValidator = (FineReaderVisualComponents.TextValidator)textVal.GetOcx();
}

private void UnloadEngine()
{
    // If Engine was loaded, unload it
    if (engine != null)
    {
        engine = null;
    }
}

private void DocumentForm_Load(object sender, EventArgs e)
{
    SyncComponents();
    LoadEngine();
}

private void DocumentForm_FormClosing(object sender, FormClosingEventArgs e)
{
    UnloadEngine();
}

Of course in a real-world application, you will probably implement a button the user can invoke to choose a file from the file system to open. It is important to note that unloading the engine is very important. Failing to do so will tie up the license for your workstation until it is manually released from the license server. We are dealing with COM interop… resource and memory management is very important.

Recognition

Running recognition processing on a loaded document is a relatively simple matter as well. Here is a method that manages the process.

private void RecognizeDocument()
{
    FREngine.ProcessingParams processingParams = synchronizer.ProcessingParams;

    FREngine.DIFRDocumentEvents_OnProgressEventHandler progressHandler =
        new FREngine.DIFRDocumentEvents_OnProgressEventHandler(document_OnProgress);

    document.OnProgress += progressHandler;

    document.Process(processingParams.PageProcessingParams,
        processingParams.SynthesisParamsForPage, processingParams.SynthesisParamsForDocument);

    document.OnProgress -= progressHandler;
}

The progressHanlder provides the opportunity to keep the UI responsive and allows users to invoke a Cancel command to stop a long-running document recognition process.

Exporting

To export a loaded document, the Export() method on your document object is invoked. Here is an example snippet that exports the loaded document to an RTF file:

synthesizeIfNeed();
Document.Export(fileName, FREngine.FileExportFormatEnum.FEF_RTF, null);

Profiles

ABBYY FineReader Engine also supports ‘Profiles’ which enable the engine to optimize its processing based on the current usage scenario. Here are the Profiles currently available.

  • DocumentConversion_Accuracy — for converting documents into editable formats, optimized for accuracy
  • DocumentConversion_Speed — for converting documents into editable formats, optimized for speed
  • DocumentArchiving_Accuracy — for creating an electronic archive, optimized for accuracy
  • DocumentArchiving_Speed — for creating an electronic archive, optimized for speed
  • BookArchiving_Accuracy — for creating an electronic library, optimized for accuracy
  • BookArchiving_Speed — for creating an electronic library, optimized for speed
  • TextExtraction_Accuracy — for extracting text from documents, optimized for accuracy
  • TextExtraction_Speed — for extracting text from documents, optimized for speed
  • FieldLevelRecognition — for recognizing short text fragments
  • BarcodeRecognition — for extracting barcodes
  • Version9Compatibility — provided for compatibility, sets the processing parameters to the default values of ABBYY FineReader Engine 9.0.

The Engine.LoadPredefinedProfile(profileName) method is used to load one of these profiles. Creating a custom user-defined profile is also supported via an INI-style format. There are detailed instructions in the included help file for assistance in creating these custom profiles. Custom user profiles are loaded with a call to Engine.LoadProfile(fileName).

Other Platforms and Products

I only used the Windows SDK for FineReader, but there are several other products available from ABBYY. There are Mac OS, Linux, Embedded and Mobile SDKs available as well. Also available is Web API for developers via ABBYY’s hosted Cloud environment on Azure (go to www.ocrsdk.com). ABBYY also has some powerful out-of-the-box OCR products to choose from. Visit their site to check out all of their offerings.

The Bottom Line

Setting up and using the ABBYY FineReader Engine SDK is really simple and it provides access to powerful OCR capabilities for your applications. I highly recommend reviewing their products if you have OCR requirements for your own application. Why re-invent the wheel?

Disclosure of Material Connection: I received one or more of the products or services mentioned above for free in the hope that I would mention it on my blog. Regardless, I only recommend products or services I use personally and believe my readers will enjoy. I am disclosing this in accordance with the Federal Trade Commission’s 16 CFR, Part 255: “Guides Concerning the Use of Endorsements and Testimonials in Advertising.

The Building Blocks of a F# Markdown Parser

by Tomas Petricek, author of F# Deep Dives

Editor’s Note: The F# Deep Dives MEAP will be 50% on December 18, 2012. Use code dotd1218au at checkout.

Markdown is a simple text-based markup language that can be used to produce clean HTML and is used by sites such as StackOverflow or GitHub. You can build your very own an efficient parser that can be extended with custom features and that allows you to process the document after parsing. In this article, based on chapter 11 of F# Deep Dives, author Tomas Petricek describes the key elements of such a project, in particular, the representation of a Markdown document.

I’ve been writing a blog for a number of years now. Since the beginning, I wanted the website to use clean and simple HTML code. Initially, I just wrote articles in HTML by hand, but then I became a big fan of Markdown, a simple text-based markup language that can be used to produce clean HTML and is used by sites such as StackOverflow or GitHub. However, none of the existing Markdown implementations supported what I wanted: I needed an efficient parser that can be extended with custom features and that allows me to process the document after parsing. That’s why I decided to write my own parser in F#.

In this article, I’ll describe the key elements of the project. In particular, I’ll discuss the key subject from a functional perspective: the representation of a Markdown document.

You might not need to implement your own text-formatting engine, but you may often face a similar task. Text processing is not only useful when working with external files (test scripts, behavior specifications, or configuration files) but also when processing user inputs in an application (such as commands or calculations).

Introducing the Markdown format

The Markdown format is a markup language that has been designed to be as readable as possible in the plain text form. It is inspired by formatting marks, such as *emphasis*, that are often used in text files, emails, or README documents. It specifies the syntax precisely and thus it is possible to translate Markdown documents to HTML.

Formatting text with Markdown

The formatting of Markdown documents is based on whitespace and common punctuation marks. The document consists of block elements (such as paragraphs, headings, and lists). A block element can contain emphasized text, links, and other formatting. The following sample demonstrates some of the syntax:

Visual F#  
=========
F# is a **programming language** that supports _functional_, as 
well as _object-oriented_ and _imperative_ programming styles. 
Hello world can be written as follows: 

    printfn "Hello world!" 

For more information, see the [F# home page] (http://fsharp.net) or 
read [Real-World Functional Programming](http://manning.com/petricek) 
published by [Manning](http://manning.com).

The document above consists of four block elements. It starts with a heading. The separator "=" is used for first level headings. We can also create second level headings using "-" as a separator. An alternative style uses a certain number of "#" characters at the beginning of the line, so, for example, ## Example is a second-level heading.

The second block is a paragraph, followed by a code sample and one more paragraph. The text in paragraphs is formatted using ** (strong) and _ (emphasis). Both asterisk and underscore can be used for strong and emphasized text—one character means emphasis and two characters means strong text. We can also create hyperlinks, which is demonstrated by the last line.

From a programming language perspective, formats such as Markdown can be viewed as domain specific languages, which is explained in the following sidebar.

Meta: external domain specific languages

The term domain specific languages (DSLs) refers to programming languages that are designed to solve problems from a particular domain or field. DSLs are useful when you need to solve a large number of problems of the same class. In that case, the time spent on developing the DSL will be balanced out by the time that you save when using the DSL to solve particular problems.

DSL can be categorized into two groups. Internal DSLs are embedded in another language (like F# or C#). Functions from the List module with the pipelining operator (|>) can be viewed as a DSL. They solve a specific problem—list processing—and solve it very well without other dependencies.

External DSLs are languages that are not constructed on top of other languages. They may be used as embedded strings (for example, regular expressions or SQL) or as standalone files (including Markdown, configuration files, Makefile, or for example, behavior specifications using language such as Cucumber).

Now that I’ve introduced the Markdown format and domain specific languages in general, let’s look at a number of benefits that we can expect from a Markdown parser written in F#.

Why another Markdown parser?

Markdown is a well-established format and there is a number of existing tools that convert it to HTML. Most of these are written using regular expressions and there are some written for almost any platform, including .NET. So, why do we need yet another processor? Here are a few reasons:

  • Creating a custom syntax extension for Markdown is quite difficult when using an implementation based on regular expressions. It is hard to find where the syntax is being processed, and changing a regular expression can lead to various unexpected interactions.
  • Most of the tools transform Markdown directly to HTML. This makes it hard to add a custom-processing step, for example, to process all code samples in the document before generating HTML.
  • A related problem is that HTML is the only supported output. What if we wanted to turn Markdown documents into another document format, such as Word or LaTeX?
  • Finally, performing a single regular expression replacement may be quite efficient, but, if the processor performs a huge number of them, the code can get quite CPU consuming. A custom implementation may give us better performance.

Let’s now look how we can achieve these goals using F#. The key element of the solution is an elegant functional representation of the document structure.

Representing Markdown documents

When solving problems in functional languages, the first question we need to answer often is: "What data structures do we need to represent the data we work with?" In case of Markdown processor, the data structure represents a document. As discussed earlier, a document consists of blocks of different kinds. Some of the blocks (like paragraphs) may contain additional inline formatting and hyperlinks.

fdeep101

Figure 1 Here you can see how different MarkdownBlock elements and different MarkdownSpan elements are used to format the sample document. All other unmarked text is represented as Literal.

Listing 1 Representation of Markdown document

type MarkdownDocument = list

and MarkdownBlock =  
  | Heading of int * MarkdownSpans
  | Paragraph of MarkdownSpans
  | CodeBlock of list

and MarkdownSpans = list

and MarkdownSpan =  
  | Literal of string
  | InlineCode of string
  | Strong of MarkdownSpans
  | Emphasis of MarkdownSpans
  | HyperLink of MarkdownSpans * string

The types that model Markdown documents are shown and explained in listing 1. I defined the types as a mutually recursive using the and keyword for two reasons. Firstly, the MakdownSpans and MarkdownSpan types are mutually recursive and they both reference each other. Secondly, I wanted to start with a type that represents the entire document rather than starting from the span to make the explanation easier to follow.

Summary

Broadly speaking, this article was about external domain specific languages. An external DSL is a small programming language or document format that has its own syntax and represents some script, document, or command. External DSLs can be used to configure an application, to provide scripting capabilities, customization, and various other tasks.

The domain specific language that we focused on was the Markdown document format. When working with external DSLs, we first write an F# representation of the language and then implement processing of the DSL.

The functional representation that I described in this article is the cornerstone of a new Markdown processor. Other components are all built around this representation. Chapter 3 of F# Deep Dives looks at three additional aspects: writing a parser that turns text into MarkdownDocument, writing an HTML generator that turns MarkdownDocument into a HTML file, and implementing the pre-processing of a document that generates the references section with all of the document links. All of these tasks are built on top of a simple representation using powerful F# features like pattern matching and active patterns.

1. The project can be found at https://github.com/tpetricek/FSharp.Formatting

2. For more information about Markdown, see http://daringfireball.net/projects/markdown

Here are some other Manning titles you might be interested in:

fdeep102

The Real-World Functional Programming

Tomas Petricek with Jon Skeet

fdeep103

HTML5 for .NET Developers

Jim Jackson II and Ian Gilman

fdeep104

IronPython in Action

Michael J. Foord and Christian Muirhead


del.icio.us Tags: ,,,

“Hello, World” Aspect


AOP in .NET
By Matthew Groves
Aspect-oriented programming is a technique that is complementary to object-oriented programming (OOP). The goal of AOP is to reduce repetitive, boilerplate code. This article, based on AOP in .NET, walks you through a very basic "Hello, World" example of using AOP in .NET. He breaks apart that example and identifies the individual puzzle pieces and how they fit together into something called an "aspect."

“Hello, World” Aspect

If you’ve never done aspects, we’ll give you a taste of what’s in store. Don’t worry if you don’t fully understand what’s going on just yet. Follow along just to get your feet wet. I’ll be using Visual Studio 2010 and PostSharp. Visual Studio Express (which is a free download) should work too. I’m also using NuGet, which is a great package manager tool for .NET that integrates with Visual Studio. If you’ve never used NuGet, you should definitely take a few minutes to check it out at NuGet.org and install it: it will make your life as a .NET developer much easier.

Start by selecting File>New Project and then Console Application. Call it whatever you want, but I’m calling mine "HelloWorld". You should be looking at an empty console project like so:

class Program {
    static void Main(string[] args) {
    }
}

Next, install PostSharp with NuGet. NuGet can work from a PowerShell command-line within Visual Studio, called Package Manager Console. To install PostSharp via the Package Manager Console, just use the Install-Package command.

Listing 1 Installing PostSharp with NuGet PowerShell console
PM> Install-Package postsharp
Successfully installed 'PostSharp 2.1.6.17'.
Successfully added 'PostSharp 2.1.6.17' to HelloWorld.

Alternatively, you can do it via the Visual Studio UI by first right-clicking on References in Solution Explorer.

image

Figure 1 Starting NuGet with the UI

Select Online, search for PostSharp, and click Install.

image

Figure 2 Search for PostSharp and install with NuGet UI

You may get a PostSharp message that asks you about licensing. Accept the free trial and continue. The Starter Edition is free for commercial use, so you can use it for free at your job too. Now that PostSharp is installed, you can close out of the NuGet dialog. In Solution Explorer under References, you should see a new PostSharp reference added to your project.

Now you’re ready to start writing your first aspect.

Create a class with one simple method that just writes to Console. Mine looks like this:

public class MyClass {
    public void MyMethod() {
        Console.WriteLine("Hello, world!");
    }
}

Instantiate this inside of the Main method,and call the method. Here’s what the Program class should look like now:

class Program {
    static void Main(string[] args) {
        var myObject = new MyClass();
        myObject.MyMethod();
    }
}

Execute that program now (F5 or CTRL+F5 in Visual Studio), and your output should look like this:

image

We’re not really pushing the limits of innovation just yet, but hang in there!

Now, create a new class that inherits from OnMethodBoundaryAspect, which is a base class in the PostSharp namespace. Something like this:

Listing 2 The first step in using the PostSharp API – derive from OnMethodBoundaryAspect
[Serializable]
public class MyAspect : OnMethodBoundaryAspect {
}

PostSharp requires aspect classes to be serializable (this is because PostSharp instantiates aspects at compile time, so they can be persisted between compile time and run time).

Congratulations, you just wrote an aspect, even though it doesn’t do anything yet. Like the name implies, this aspect allows you to insert code on the boundaries of a method. Let’s make an aspect that inserts code before and after a method gets called. Start by overriding the OnEntry method. Inside of that method, write something to Console, like this:

Listing 3 Override the OnEntry method to add some functionality
[Serializable]
public class MyAspect : OnMethodBoundaryAspect {
    public override void OnEntry(MethodExecutionArgs args) {
        Console.WriteLine("Before the method");
    }
}

Notice the MethodExecutionArgs parameter. It’s there to give information and context about the method being bounded. We won’t use it in this simple example, but argument objects like that are almost always used in a real aspect. Create another override, but, this time, override OnExit.

Listing 4 Override the OnExit to add more functionality
[Serializable]
public class MyAspect : OnMethodBoundaryAspect {
    public override void OnEntry(MethodExecutionArgs args) {
        Console.WriteLine("Before the method");
    }
    public override void OnExit(MethodExecutionArgs args) {
        Console.WriteLine("After the method");
    }
}

Now you have written an aspect that will write to Console before and after a method. But, which method? The most basic way to tell PostSharp which method (or methods) to apply this aspect to is to use the aspect as an attribute on the method. For instance, to put it on the boundaries of the earlier "Hello, World" method, just use it on the method like so:

Listing 5 Apply the aspect to a method by using an attribute
public class MyClass {
    [MyAspect]
    public void MyMethod() {
        Console.WriteLine("Hello, world!");
    }
}

Now, run the application again (F5 or CTRL+F5). You should see an output like this:

image

Figure 4 Output with MyAspect applied

That’s it. You’ve now written an aspect and told PostSharp where to use that aspect. This example may not seem that impressive, but notice that you were able to put code around the method without making MyMethod any changes to MyMethod itself. Yeah, you did have to add that [MyAspect] attribute, but there are more efficient and/or centralized ways of applying PostSharp aspects.


Here are some other Manning titles you might be interested in:

image

Spring in Action, Third Edition

Craig Walls

image

Spring in Practice

Willie Wheeler, John Wheeler, and Joshua White

image

Spring Integration in Action

Mark Fisher, Jonas Partner, Marius Bogoevici, and Iwein Fuld